DataHub MCP Server
The DataHub MCP Server implements the Model Context Protocol (MCP), giving AI agents direct access to your DataHub metadata. Search for data assets, traverse lineage, inspect schemas, and generate SQL — all through natural language in tools like Cursor, Windsurf, Claude Desktop, and OpenAI.
Want to learn more about the motivation, architecture, and advanced use cases? Check out our deep dive blog post.
Deployment Options
- Managed MCP Server - Available on DataHub Cloud v0.3.12+
- Self-Hosted MCP Server - Available for DataHub Core
Capabilities
Search for Data
Find the right data by asking questions in plain English. Supports wildcard matching (revenue_*), field searches (tag:PII), and boolean logic ((sales OR revenue) AND quarterly).
Dive Deeper
Get usage stats, ownership, documentation, tags, glossary terms, and quality signals for any table, column, dashboard, & more — so agents can separate signal from noise.
Lineage & Impact Analysis
Trace data flow at table and column level, upstream or downstream, across multiple hops. Understand the origins of your data, and plan for upcoming changes.
Query Analysis & Authoring
Surface real SQL queries that reference a dataset — see join patterns, common filters, and aggregation behavior — then generate new queries grounded in actual usage.
Works Where You Work
Seamlessly integrates with Cursor, Windsurf, Claude Desktop, OpenAI, and any other MCP-compatible client.
Tools
The DataHub MCP Server provides the following tools, grouped by whether they read from or write to DataHub. All tools are annotated with MCP-standard hints (readOnlyHint, destructiveHint, idempotentHint) so compatible clients (e.g. Claude) can surface which tools modify catalog state and prompt for confirmation accordingly.
Read-Only Tools
These tools only query DataHub and never modify catalog state.
Discovery & Inspection — Find entities (datasets, dashboards, users, etc.), pull their full metadata, drill into schemas, trace lineage upstream or downstream at the table and column level, and search across saved documents and glossary term history.
Document tools (search_documents, grep_documents) are automatically hidden if no documents exist in the catalog.
Tools
search — Search DataHub using structured keyword search (/q syntax) with boolean logic, filters, pagination, and optional sorting by usage metrics.
get_entities — Fetch detailed metadata for one or more entities by URN; supports batch retrieval for efficient inspection of search results.
list_schema_fields — List schema fields for a dataset with keyword filtering and pagination, useful when search results truncate fields or when exploring large schemas.
get_me — Retrieve information about the currently authenticated user, including profile details and group memberships.
get_lineage — Retrieve upstream or downstream lineage for any entity (datasets, columns, dashboards, etc.) with filtering, query-within-lineage, pagination, and hop control.
get_lineage_paths_between — Retrieve the exact lineage paths between two assets or columns, including intermediate transformations and SQL query information.
search_documents — Search for documents using keyword search with filters for platforms, domains, tags, glossary terms, and owners.
grep_documents — Search within document content using regex patterns. Useful for finding specific information across multiple documents.
list_lifecycle_stages — List the lifecycle stages (e.g. proposed, approved, deprecated) configured for glossary terms.
get_glossary_term_versions / compare_glossary_term_versions — Inspect version history for a glossary term, or diff two versions to see what changed.
SQL & Queries — Surface real queries that hit a dataset and use that context to draft new SQL grounded in actual usage, joins, and filters.
Tools
get_dataset_queries — Fetch real SQL queries referencing a dataset or column—manual or system-generated—to understand usage patterns, joins, filters, and aggregation behavior.
find_sql_context — Locate relevant tables, columns, and example queries for drafting SQL grounded in real catalog usage.
draft_sql_for_tables — Draft a SQL query against a specified set of tables using context retrieved from DataHub (schemas, sample queries, lineage).
Governance — Review pending metadata change proposals awaiting approval.
Tools
list_pending_proposals — List metadata change proposals that are pending review.
Mutation Tools
Mutation tools are available in mcp-server-datahub v0.5.0+ and on DataHub Cloud v0.3.17+. They are enabled via the TOOLS_IS_MUTATION_ENABLED=true environment variable. Each tool is annotated with readOnlyHint: false so MCP clients can require confirmation before invoking them.
Metadata Editing — Apply tags, glossary terms, ownership, domains, descriptions, and structured properties to entities or individual columns. Also handles entity/term lifecycle stage transitions and document authoring.
Tools
add_tags / remove_tags — Add or remove tags from entities or schema fields (columns). Supports bulk operations on multiple entities.
add_terms / remove_terms — Add or remove glossary terms from entities or schema fields. Useful for applying business definitions and data classification.
add_owners / remove_owners — Add or remove ownership assignments from entities. Supports different ownership types (technical owner, data owner, etc.).
set_domains / remove_domains — Assign or remove domain membership for entities. Each entity can belong to one domain.
update_description — Update, append to, or remove descriptions for entities or schema fields. Supports markdown formatting.
add_structured_properties / remove_structured_properties — Manage structured properties (typed metadata fields) on entities. Supports string, number, URN, date, and rich text value types.
set_lifecycle_stage — Set the lifecycle stage (e.g. proposed, approved, deprecated) of an entity or glossary term directly.
save_document — Save standalone documents (insights, decisions, FAQs, notes) to DataHub's knowledge base. Documents are organized under a configurable parent folder.
Glossary Authoring — Create new glossary terms, version them over time, and link related terms together.
Tools
create_glossary_term — Create a new glossary term directly.
create_glossary_term_version — Create a new version of an existing glossary term to capture changes over time.
add_related_terms — Link related glossary terms (e.g. synonyms, contains, inherits-from) to express relationships in the business vocabulary.
Proposals (governed workflows) — Submit changes for review rather than applying them directly, and accept or reject pending proposals. Useful when an agent should suggest, not commit, metadata changes.
Tools
propose_create_glossary_term — Submit a proposal to create a new glossary term, pending approval.
propose_lifecycle_stage — Submit a proposal to change an entity's lifecycle stage, pending approval.
accept_or_reject_proposals — Accept or reject pending metadata change proposals.
Connecting to Managed MCP Server with OAuth - Recommended
Available in DataHub Cloud v1.0.2+
DataHub Cloud supports OAuth2 with Dynamic Client Registration (DCR) for MCP, so each DataHub user can connect with their own personal login — including SSO through providers like Okta, Azure AD, and others configured for your tenant. Compatible MCP clients (Claude, Claude Code, Cursor, ChatGPT, Snowflake, Databricks, etc.) discover the auth server, register themselves, and walk you through a browser-based login. Tokens are scoped to the signed-in user and refresh automatically.
Single Entry Point
Point your MCP client at the universal endpoint:
https://mcp.datahub.com/mcp
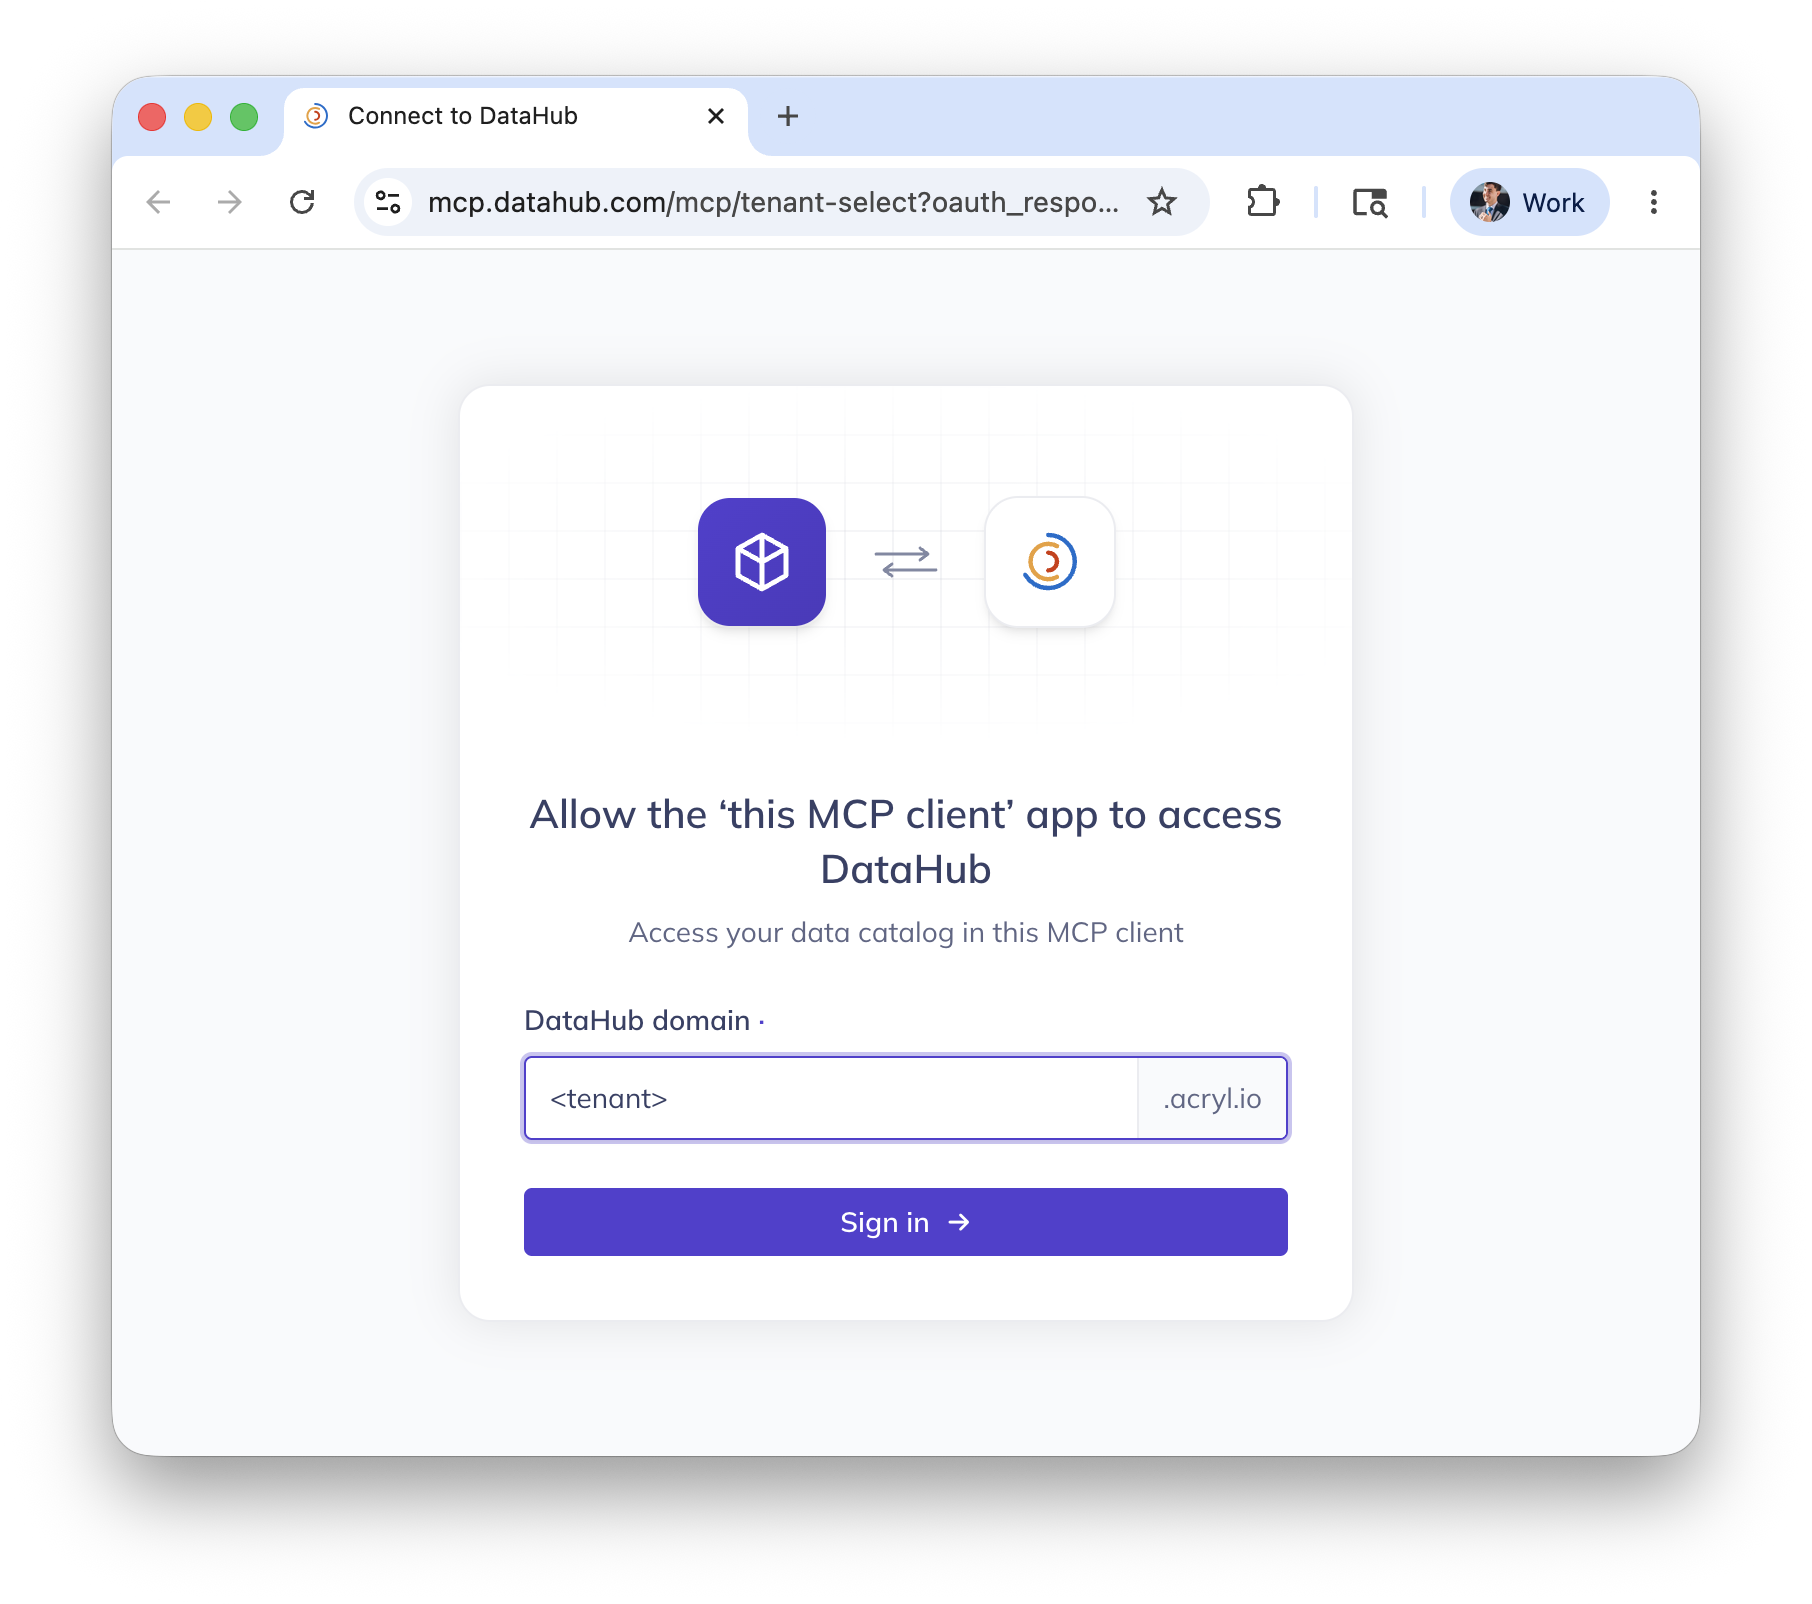
On first connection, the page prompts you for your DataHub domain (e.g. <tenant> for https://<tenant>.acryl.io). Enter it once and the OAuth flow redirects you to your tenant's login, then back to the client — fully authenticated, no token copy-paste required.
Use your direct tenant URL instead
If you'd rather skip the domain prompt at mcp.datahub.com, you can point clients directly at your tenant:
https://<tenant>.acryl.io/integrations/ai/mcp
This endpoint also supports OAuth2 + DCR. The only difference is that mcp.datahub.com/mcp is a single shared URL you can hand out without knowing the tenant ahead of time — handy for marketplace listings or shared docs.
For on-premises DataHub Cloud, use your DataHub FQDN, e.g. https://datahub.example.com/integrations/ai/mcp.
Configure Your Client
Claude (web, desktop, mobile)
- In claude.ai or Claude Desktop, open Settings → Connectors (Team/Enterprise: Organization settings → Connectors).
- Click Add custom connector.
- Name:
DataHub. Remote MCP server URL:https://mcp.datahub.com/mcp. Leave the Advanced settings (OAuth Client ID / Secret) empty — DataHub registers the client automatically via DCR. - Click Add, then Connect. Claude opens a browser window for the DataHub OAuth flow.
- Enter your DataHub domain when prompted (e.g.
<tenant>), sign in, and approve the connection.
Remote MCP connectors are configured via the Claude UI, not claude_desktop_config.json — that file is reserved for local stdio servers. For older Claude Desktop versions without remote MCP support, fall back to the mcp-remote bridge with a PAT.
Claude Code
Claude Code supports OAuth-based remote MCP servers natively, including Dynamic Client Registration:
claude mcp add --transport http datahub https://mcp.datahub.com/mcp
The first time you invoke a DataHub tool, the server responds 401 Unauthorized. Claude Code flags the server as needing authentication — run /mcp inside Claude Code and select Authenticate to complete the browser-based OAuth flow. Enter your DataHub domain when prompted; tokens are stored securely and refreshed automatically.
To use your tenant URL directly:
claude mcp add --transport http datahub https://<tenant>.acryl.io/integrations/ai/mcp
Cursor
Cursor supports remote MCP servers via the url field and handles OAuth flows automatically.
Open Cursor → Settings → Cursor Settings → Tools & MCP → New MCP Server (or edit
~/.cursor/mcp.jsonfor global config /.cursor/mcp.jsonfor project-scoped config).Paste:
{
  "mcpServers": {
    "datahub": {
      "url": "https://mcp.datahub.com/mcp"
    }
  }
}
Save. Cursor triggers the OAuth flow in your browser using the
cursor://anysphere.cursor-mcp/oauth/callbackcallback — enter your DataHub domain and sign in.The MCP settings page should show a green dot and list the DataHub tools.
ChatGPT
Custom MCP connectors require Developer Mode and are available on Plus, Pro, Team, Enterprise, and Edu plans (not Free).
- Enable Developer Mode: profile picture → Settings → Connectors → Advanced, then toggle Developer mode on. (On Team/Enterprise, an admin must first allow it under Workspace Settings → Permissions & Roles → Connected Data → Developer mode / Create custom MCP connectors.)
- Still under Settings → Connectors, click Add custom connector (or Create).
- Name:
DataHub. MCP server URL:https://mcp.datahub.com/mcp. Authentication: OAuth. - Save. ChatGPT walks you through the OAuth flow — enter your DataHub domain and sign in. Pick which DataHub tools to enable for the connector.
Snowflake Cortex Agents / Snowflake Intelligence
Snowflake exposes external MCP servers to Cortex Agents through an API Integration + External MCP Server object pair. Both are created via SQL by an ACCOUNTADMIN, then the resulting connector is added to an agent in Snowsight.
Create an API integration using DCR (run as
ACCOUNTADMIN):CREATE API INTEGRATION datahub_mcp_api_integration
API_PROVIDER = external_mcp
API_ALLOWED_PREFIXES = ('https://mcp.datahub.com')
API_USER_AUTHENTICATION = (
TYPE = OAUTH_DYNAMIC_CLIENT,
OAUTH_RESOURCE_URL = 'https://mcp.datahub.com/mcp'
)
ENABLED = TRUE;Create the MCP server object:
CREATE EXTERNAL MCP SERVER datahub_mcp_server
  WITH DISPLAY_NAME = 'DataHub'
  URL = 'https://mcp.datahub.com/mcp'
  API_INTEGRATION = datahub_mcp_api_integration;
In Snowsight, navigate to AI & ML → Agents, open your agent, choose MCP Connectors, and add the DataHub connector.
In Snowflake Intelligence, click Connect next to the DataHub connector — Snowflake walks each user through the DataHub OAuth flow and reuses the credential on subsequent calls.
See the Snowflake agent context guide for end-to-end setup, or use your tenant URL (https://<tenant>.acryl.io/integrations/ai/mcp) in place of mcp.datahub.com if you prefer.
Databricks (Agent Bricks / Genie / AI Playground)
Databricks registers external MCP servers as Unity Catalog HTTP connections behind a managed proxy. The connection then becomes available to Agent Bricks, Genie Code, and AI Playground at https://<workspace>/api/2.0/mcp/external/<connection_name>.
- In your workspace, open Catalog → External Data → Connections → Create connection (requires
CREATE CONNECTIONon the metastore). - Connection type: HTTP. Name:
datahub. URL:https://<tenant>.acryl.io/integrations/ai/mcp(your tenant URL is required here — the globalhttps://mcp.datahub.com/mcpendpoint is not yet supported by Databricks). - Check the Is MCP connection box.
- For Auth type, select Dynamic Client Registration (DCR per RFC 7591) — Databricks registers a client with DataHub automatically and stores refresh tokens.
- Save. The first time the agent uses a DataHub tool, each operator authorizes DataHub via the workspace's managed OAuth flow.
DCR requires the workspace's Managed MCP Servers preview to be enabled and the workspace to be in a Model Serving–supported region. The HTTP connection must use streamable HTTP transport (DataHub's /mcp endpoint does).
See the Databricks Agent Bricks and Databricks Genie guides for end-to-end agent setup.
When to Use PAT Auth Instead
OAuth + DCR is the recommended path for interactive clients where a human signs in. Stick with personal access tokens (described below) for:
- Service accounts and unattended agentic workflows (CI/CD, scheduled jobs)
- DataHub Cloud < v1.0.2 or self-hosted DataHub Core
- MCP clients that don't yet implement OAuth-based remote MCP
Connecting to Managed MCP Server with Access Tokens
For DataHub Cloud v0.3.12+, you can connect directly to the hosted MCP server endpoint — no local installation required.
The managed MCP server endpoint is only available with DataHub Cloud v0.3.12+. For DataHub Core and older versions of DataHub Cloud, self-host the MCP server instead.
DataHub's managed MCP server uses the streamable HTTP transport. Some older MCP clients (e.g. chatgpt.com) may only support the deprecated SSE transport — for those, use mcp-remote to bridge the gap.
Prerequisites
- The URL of your DataHub Cloud instance, e.g.
https://<tenant>.acryl.io - A personal access token
Connecting & Authenticating
Your managed MCP server URL is:
https://<tenant>.acryl.io/integrations/ai/mcp/
There are two ways to authenticate:
Authorization header — pass your token as a Bearer token in the
Authorizationheader:Authorization: Bearer <token>Token in URL — append your token as a query parameter:
https://<tenant>.acryl.io/integrations/ai/mcp/?token=<token>This is a convenient alternative when your MCP client doesn't support custom headers.
On-Premises DataHub Cloud
For on-premises DataHub Cloud, replace <tenant>.acryl.io with your DataHub FQDN, e.g. https://datahub.example.com/integrations/ai/mcp/?token=<token>.
Configure
Claude Desktop
- Open your
claude_desktop_config.jsonfile. You can find it by navigating to Claude Desktop -> Settings -> Developer -> Edit Config. - Update the file to include the following content. Be sure to replace
<tenant>and<token>with your own values.
{
  "mcpServers": {
    "datahub-cloud": {
      "command": "npx",
      "args": [
        "-y",
        "mcp-remote",
        "https://<tenant>.acryl.io/integrations/ai/mcp/?token=<token>"
      ]
    }
  }
}
Claude Code
Claude Code natively supports streamable HTTP, so no proxy or additional dependencies are needed.
Run the following command, replacing <tenant> and <token> with your own values:
claude mcp add --transport http datahub-cloud \
  "https://<tenant>.acryl.io/integrations/ai/mcp/" \
  --header "Authorization: Bearer <token>"
For a detailed walkthrough, see the Claude integration guide.
Cursor
- Make sure you're using Cursor v1.1 or newer.
- Navigate to Cursor -> Settings -> Cursor Settings -> MCP -> add a new MCP server.
- Enter the following into the file, replacing
<tenant>and<token>with your own values:
{
  "mcpServers": {
    "datahub-cloud": {
      "url": "https://<tenant>.acryl.io/integrations/ai/mcp/",
      "headers": {
        "Authorization": "Bearer <token>"
      }
    }
  }
}
- Once you've saved the file, confirm that the MCP settings page shows a green dot and the DataHub tools listed.
For a detailed walkthrough, see the Cursor integration guide.
Gemini CLI
gemini mcp add --transport http \
  --header "Authorization: Bearer <token>" \
  datahub-cloud \
  "https://<tenant>.acryl.io/integrations/ai/mcp/"
For a detailed walkthrough, see the Gemini CLI integration guide.
Other
Most AI tools support remote MCP servers. Provide the hosted MCP server URL:
https://<tenant>.acryl.io/integrations/ai/mcp/?token=<token>
Make sure authentication mode is not set to "OAuth" (if applicable).
For clients that don't yet support remote MCP servers, use mcp-remote:
- Command:
npx - Args:
-y mcp-remote https://<tenant>.acryl.io/integrations/ai/mcp/?token=<token>
Service Accounts for Agentic Workflows
For autonomous or agentic workflows — such as CI/CD pipelines, scheduled scripts, or AI agents that run without human intervention — we recommend using a Service Account rather than a personal access token.
Setup:
- Create a service account in Settings > Users & Groups > Service Accounts
- Generate an access token for the service account
- Use that token when configuring the MCP server connection
Scoping search with a Default View (DataHub Cloud v1.0.0+ / DataHub Core v1.6.0+):
Service accounts support a Default View that restricts which data assets the MCP server searches across. This is configured directly from the Service Accounts management screen (the "Default View" column). When set, all searches performed by the MCP server using that service account's token will be scoped to the selected view — useful for limiting an agent's visibility to a specific domain, platform, or team's assets.
Combine a service account with a default view to create a tightly-scoped MCP connection — for example, a "Snowflake Production" view for an agent that only needs access to production Snowflake datasets.
Self-Hosted MCP Server Usage
Run the open-source MCP server locally. This works with any DataHub instance — both DataHub Core and DataHub Cloud.
Prerequisites
Install
uv:# macOS and Linux
curl -LsSf https://astral.sh/uv/install.sh | shThe URL of your DataHub instance's GMS endpoint, e.g.
http://localhost:8080orhttps://<tenant>.acryl.io
Connecting & Authenticating
The self-hosted server authenticates via environment variables:
DATAHUB_GMS_URL— your DataHub GMS endpointDATAHUB_GMS_TOKEN— your personal access token
These are passed to the mcp-server-datahub process at startup (see configuration examples below).
Configure
Claude Desktop
Run
which uvxto find the full path to theuvxcommand.Open your
claude_desktop_config.jsonfile. You can find it by navigating to Claude Desktop -> Settings -> Developer -> Edit Config.Update the file to include the following content. Be sure to replace the placeholder values.
{
  "mcpServers": {
    "datahub": {
      "command": "<full-path-to-uvx>",  // e.g. /Users/hsheth/.local/bin/uvx
      "args": ["mcp-server-datahub@latest"],
      "env": {
        "DATAHUB_GMS_URL": "<your-datahub-url>",
        "DATAHUB_GMS_TOKEN": "<your-datahub-token>"
      }
    }
  }
}
Claude Code
Run the following command, replacing the placeholder values:
claude mcp add datahub \
  -e DATAHUB_GMS_URL="<your-datahub-url>" \
  -e DATAHUB_GMS_TOKEN="<your-datahub-token>" \
  -- uvx mcp-server-datahub@latest
For a detailed walkthrough, see the Claude integration guide.
Cursor
- Navigate to Cursor -> Settings -> Cursor Settings -> MCP -> add a new MCP server.
- Enter the following into the file, replacing the placeholder values:
{
  "mcpServers": {
    "datahub": {
      "command": "uvx",
      "args": ["mcp-server-datahub@latest"],
      "env": {
        "DATAHUB_GMS_URL": "<your-datahub-url>",
        "DATAHUB_GMS_TOKEN": "<your-datahub-token>"
      }
    }
  }
}
- Once you've saved the file, confirm that the MCP settings page shows a green dot and the DataHub tools listed.
For a detailed walkthrough, see the Cursor integration guide.
Gemini CLI
gemini mcp add \
  -e DATAHUB_GMS_URL="<your-datahub-url>" \
  -e DATAHUB_GMS_TOKEN="<your-datahub-token>" \
  datahub \
  uvx mcp-server-datahub@latest
For a detailed walkthrough, see the Gemini CLI integration guide.
Other
For other AI tools, provide the following configuration:
- Command:
uvx - Args:
mcp-server-datahub@latest - Env:
DATAHUB_GMS_URL:<your-datahub-url>DATAHUB_GMS_TOKEN:<your-datahub-token>
Troubleshooting
spawn uvx ENOENT
The full stack trace might look like this:
2025-04-08T19:58:16.593Z [datahub] [error] spawn uvx ENOENT {"stack":"Error: spawn uvx ENOENT\n at ChildProcess._handle.onexit (node:internal/child_process:285:19)\n at onErrorNT (node:internal/child_process:483:16)\n at process.processTicksAndRejections (node:internal/process/task_queues:82:21)"}
Solution: Replace the uvx bit of the command with the output of which uvx.